

Andrew Robinson began his career as an art director in entertainment advertising in 2003, after graduating from Art Center College of Design. In 2006, he became a creative director at Crew Creative Advertising, and oversaw the agency's Television Division, where he worked for clients such as TNT, TBS, History, FX, and Bravo to name a few. He now has one of the most popular AV-related channels on YouTube.
We'd like to thank ProjectorScreen.com for their assistance with our projector evaluations and testing. Their yearly shoot-out, extensive selection and helpful attitude makes our life easier when we need to dig in a little more.

One of the best things about going to tradeshows is that there is always a chance you'll discover a manufacturer or product you wouldn't otherwise have noticed. At CEDIA 2010 I had such an encounter at the Audio Plus Services booth - with the front projection company DreamVision. Audio Plus Services is hardly an unknown distributor, representing lines such as Focal, Cambridge Audio and Pathos, but it was their intimate display for DreamVision that caught my eye. Tucked inside a small covered booth was the DreamVison Starlight 3 showing Iron Man on Blu-ray. The room itself wasn't crowded, there wasn't even a representative (when I stopped by) on hand to speak to, leaving the Starlight 3 to do all the talking.
And talk it did.
Additional Resources
• Read more front projector reviews from the staff at HomeTheaterReview.com.
• Find an excellent projector screen to pair with the Starlight 3.
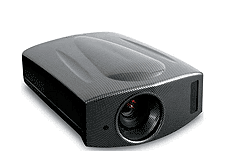
The image quality was stunning, so good in fact that I immediately requested a review from Audio Plus Services' Peter Hoagland. A few weeks later the Starlight 3 arrived at my doorstep. My particular review sample was finished in DreamVision's own faux Carbon Fiber finish, which is crazy-sexy-cool if you're into the look, which I am. For those of you looking for something more subdued, DreamVision also offers the Starlight 3 in white, black and red, with custom colors available at an extra cost. Speaking of customization, it's a large part of what DreamVision is all about for everything about their product, distribution and support is geared towards giving the consumer a customized experience.
Start with the projector, which begins its life as an OEM JVC D-ILA (JVC's RS35U to be exact) that DreamVision then takes to their factory for a series of tweaks. Physically, the differences are immediately noticeable for the Starlight 3 looks nothing like a JVC projector other than its lens and input placement. The outer shell or shape of the Starlight 3 is the work of French designer Antoine Beon who has also done design work for Focal's Electra line of loudspeakers. The casework is more than just a simple facelift, helping to cut fan/machine noise considerably over the original JVC design, which I'll talk about later. In its new skin the Starlight 3 measures 15 inches wide by nearly 20 inches deep and eight inches high, which is large but not unruly as is the case with some other high-end, high style projectors I've seen. The Starlight 3 is a little on the heavier side tipping the scales at just under 30 pounds, which isn't too much of an issue when you consider the vast majority will be installed by a custom installer.
Beyond the cosmetic changes, DreamVision takes each Starlight 3 and hand calibrates it at the factory, maximizing the power supply and internal circuitry before specifically adjusting gamma, using its six axis color management system for each of the projector's colors as well as adjusting its hue, saturation and luminance settings.
From there the Starlight 3 is sold exclusively through a dedicated dealer network that can provide the increased level of service DreamVision demands in order to bring the consumer the best possible home theater experience. But what is the added cost for all this customization, hand calibration and specialty treatment? Try $13,595 retail, or $3,595 more than the original JVC projector the Starlight 3 is based on.
Beyond the upgrades the Starlight 3 is still, at its core, a three chip D-ILA projector with a native resolution of 1920 by 1080 into a 16:9 aspect ratio suitable for screen sizes ranging from 60-inches to 240-inches diagonal. It has a reported brightness of 900 ANSI Lumens, courtesy of its single 3,000-hour lamp, and an outrageous contrast ratio (claimed) of 70,000:1. The Starlight 3 features 120Hz motion processing, which JVC calls Clear Motion Drive, though DreamVision makes zero mention of it on their website, which made me happy, that was until I later discovered it in the Starlight 3's brochure. DreamVision calls their 120Hz processing Crystal Motion. I like to call it the "ruin Blu-ray feature." The DreamVision uses an internal HQV Reon-VX video processor and carries with it ISF and THX image certification. The Starlight 3 features a motorized lens with a 1.4-2.8:1 throw ratio, 16-step aperture and control for 2x zoom and 80-percent height and 34-percent lens shift. Speaking of lenses ,the Starlight 3 also has an anamorphic lens mode, which allows for the proper display of anamorphic or 2:35.1 content when used with an anamorphic lens attachment for which DreamVision offers several at an extra cost.
In terms of inputs the Starlight 3 offers two HDMI 1.3 inputs as well as a single composite, component, S-Video and analog PC input. There are also 12-volt triggers as well as a detachable power cord, all of which are located along the right side of the projector itself. The Starlight 3's manual controls are located on the back of the projector, but most users are going to stick to using the remote or better yet, a home automation system.
In terms of a remote, the Starlight 3's is nicely laid out, if not a little long, with full push-button backlighting and hard controls for all of the picture modes, picture controls, lens controls, aspect ratio selections and inputs. There is even a button marked "test," which you can press to cycle through the Starlight 3's numerous internal test patterns and calibration aides. While I wish it was a little more compact, the Starlight 3's remote is clearly and intelligently laid out and exceedingly simple to use.
The Hookup
Integrating the Starlight 3 into my reference system was a breeze since it would be replacing another OEM JVC projector, my reference Anthem LTX-500 D-ILA projector. Both the Starlight 3 and my Anthem have the same mounting points, which made mounting the Starlight to my ceiling a cinch, though I wouldn't recommend doing it alone due to the Starlight 3's size and weight. (The chances of you mounting a Starlight 3 on your own are practically zero for your local Starlight dealer will most assuredly do it for you.)
Once on my ceiling I affixed the Starlight 2:35:1 Wide System kit that DreamVision kindly sent along with the review unit. The Wide System kit consists of a Schneider sourced anamorphic or 2:35:1 lens and bracket system that connects to the Starlight 3 via a pair of mounting holes located along the front bottom edge of the projector. The Wide System kit is a $7,995 add-on, which allows for the Starlight 3 to display 2:35:1 native material without black bars top and bottom. It also brings the total price of the Starlight 3 to a bit over $21,000 retail should you require a constant height 2:35:1 / 16:9 solution.
Mounting the Wide System kit was a little trickier than my reference anamorphic lens kit from Panamorph, for it features a few tiny screws that are somewhat difficult to get your hands and tools around in order to secure the lens to its mounting bracket. Ultimately, I ended up taking the projector down off the ceiling to affix the lens before re-installing it on my ceiling to ensure a safe and secure fit.
A quick note on the Starlight 3's Wide System kit, and all anamorphic lens adaptors for that matter: they are not required to view 2:35:1 material on a 2:35:1 screen. You can simply zoom your projector out until the projected black bars top and bottom simply "fall off" the screen, i.e. onto the surrounding black frame. Obviously if you wish to view 16:9 content after adjusting for 2:35:1 content you'll have to re-adjust the image or zoom in so that that the image fits within a 16:9 frame. The reason anamorphic lens kits or adaptors are so popular is, one, a matter of convenience and two, they work with many high-end projectors' vertical stretch modes, meaning you're using all of the projector's sensor to display the image versus wasting it on projecting black bars top and bottom as is the case with 2:35:1 material not shown through an anamorphic lens. On the flip side, when using an anamorphic lens adaptor or lens, you're losing a bit of vertical resolution when viewing 16:9 content but it's not enough that you're ultimately going to notice.
With the Starlight 2:35 Wide System kit in place and the projector securely mounted to my ceiling, it came time to "dial" things in, which for me began with setting the distance, positioning and focus, of which all three are easily controlled via remote. I currently have three screens in my reference home theater; Elite Screens Osprey Dual Series Screen, which is a 2:35:1 / 16:9 unity gain, motorized drop down combination and a Screen Innovations (SI) Reference Motorized 16:9 Lunar HD screen. I went ahead and got the Starlight 3's image configured on the Osprey Screen's 2:35:1 screen first since going from 2:35:1 to 16:9 was simply going to require me to hit the "Aspect Ratio" button on the Starlight 3 remote control and taking the projector from its native 16:9 aspect ratio to an old-school 4:3 (the Wide System kit is a vertical compression lens).
With alignment and focus out of the way I began to calibrate the Starlight 3 using my trusty Digital Video Essentials disc on Blu-ray. I should point out that the Starlight 3, along with several higher-end JVC projectors, features a "THX-Pro" picture setting (selectable via remote or through the on-screen menu), which some would say means the projector is calibrated out of the box. Perhaps they are correct, however that setting and certification come from a "laboratory" where conditions are ideal, but not ultimately real-world. Is it a good place to start? Sure, though a lot of the image controls are disabled in THX-Pro mode, but it's not a bad way to check your work or compare results if you feel so inclined.
For me, I began by loading up the "standard" picture setting and modifying from there. In my real-world media room, THX-Pro is a bit subdued in terms of brightness, contrast and saturation. Then again I don't watch movies in a cave, complete with black carpet, walls and floors. With minor tweaking to the Starlight 3's "standard" picture setting I was able to achieve a more suitable image for my environment overall. I did end up using the THX-Pro's color temperature settings and curves, for I found them to be very accurate, adjusting only brightness, contrast and sharpness in order to create my own personal picture setting with the help of my Digital Video Essentials disc. I should point out that all of my adjustments to the Starlight 3's image were minor and the result of my wanting to get a more suitable image in my particular environment and not the result of poor image settings and/or out-of-the-box calibration from DreamVision's factory.
Calibrating the Starlight 3 was a breeze thanks to its very thoughtful and through onscreen menu, which I happened to know like the back of my hand since it was the same menu architecture as my Anthem LTX-500. The last menu option I had to "tune" before getting down to business was disabling the Starlight 3's 120Hz processing, which I personally cannot stand, though I understand it's a feature many consumers value and enjoy.
Performance
I began my evaluation of the Starlight 3 with Iron Man 2 (Paramount) on Blu-ray. Right off the bat what struck me was the Starlight 3's superb black level. Deep, rich blacks are the Achilles heel of any front projector, though you wouldn't know it from watching the jailhouse sequences in Iron Man 2 featuring Mickey Rourke and Robert Downey Jr. The Starlight 3's ability to resolve low light detail and transition from video black to the scene's lighter elements, mainly the areas directly surrounding the overhead lamps without banding was simply amazing. The texture the Starlight 3 was able to convey in the dark, damp quarters of the French holding cell was equally impressive.
Read more about the performance of the Starlight 3 on Page 2.

Even though the scene between our hero and his arch nemesis was largely a monochromatic affair, there were still punches of color, mainly in the actors' flesh tones and clothing that were rendered naturally (albeit a bit cross processed) and in stark contrast to their surroundings. Moving out of the shadows and into the light, the race sequence was a cornucopia of rich, vibrant colors that despite being a bit hyper real (per the director and colorist's intent) never felt unnatural given the film's overall color pallette. Reds and blues were especially captivating and possessed excellent composure and subtlety, especially in terms of texture and monochromatic color rendering, evident in Tony Stark's racing suit and portable Iron Man armor. Speaking of armor - the Starlight 3's rendering of reflections in the various metallic surfaces, especially those seen in the black sheet metal of Stark's Bentley and often blown out highlights of his suit, were testament to the Starlight 3's ability to resolve even the finest of details that are often glossed over by lesser projectors.
Motion across the board was smooth, natural and artifact-free with this reviewer seeing no need for 120Hz processing in order to achieve proper, natural looking motion, be it in camera or by the camera itself. Edge fidelity was also top-notch with no artificial sharpening present or needed in order to create a well-focused, appropriately deep three-dimensional image. Another nicety about the Starlight 3's natural, crisp focus was that it didn't betray many of the film's CG effects and/or compositing the way other HD projectors can and often do.
Switching gears, I cued up Knight and Day (20th Century Fox) starring Tom Cruise and Cameron Diaz on Blu-ray. Knight and Day is a largely comedic action romp across the globe featuring beautiful locals, large explosions and wanton chase sequences. Knight and Day features a far more realistic color pallette over that of Iron Man 2, though the colors in Knight and Day have clearly been enhanced, especially when it comes to primary colors and their saturation points. That being said, the Starlight 3 showcased them all and kept them from impeding on one another without so much as hiccup. Skin tones, especially those of lead actress Cameron Diaz, were natural (well, as natural as you can expect in Hollywood) and smooth, yet didn't appear glassy or porcelain-like thanks to the Starlight 3's ability to resolve fine detail and texture while maintaining the film's natural grain structure.
The chase sequence through the streets of Spain at the end of the film was simply glorious and at times overwhelming for me. There is a sequence during the chase in which Cruise and Diaz, chased by baddies, race through the center of town littered with cafes, fountains and pedestrians. During these moments I was utterly amazed at just how much detail the Starlight 3 was able to capture as the action, camera and subsequently the viewer went racing through. Fine detail such as the texture of the handmade bricks, cobblestone streets and wrought iron window frames down to the lettering in the windows of the corner shops was present and rendered as cleanly as it would've been had the action and camera been still.
There is an effect in Knight and Day that the filmmakers use to visually illustrate when our heroes, mostly Cameron Diaz's character, are coming out of a drug induced sleep. During these sequences highlights are blown out, there is a steep contrast curve and colors, while not as detailed, appear punchier if not a little "streaky." The combined effect is one that is a touch warped around the character's edges that transitions into a Gaussian blur towards the edges of the frame itself. The reason I call attention to these shots is that despite the filmmaker's intent to blow out the highlights, the Starlight 3 didn't do so at the cost of the rest of the image, instead allowing the highlights to be brilliant without blooming. More impressive still was the fact that the Starlight 3 didn't show banding throughout the highlights as the detail towards the edges of the frame became less thanks to the filmmakers' introduced blur. As impressed as I was with the Starlight 3's ability to render everything from the darkest of shadows on to the most brilliant of colors, I think I was most impressed by its ability to retain its composure in the face of almost zero pixel information, such as ultra brilliant whites or bright, largely out of focus, highlights which have little to no information for the sensor to "hang on to."
I ended my evaluation with a film that needs no introduction, Warner Brothers' The Dark Knight (Warner Brothers) on Blu-ray. If there was ever a doubt as to the Starlight 3's ability to convey a true cinematic experience in the home this film erased it. I cue up The Dark Knight every time I get a new projector for review, if for no other reason than to see how one compares to the other. I won't wax poetic about contrast, sharpness, color fidelity etc, instead I will simply leave you with this: the Starlight 3 was able to reproduce the feeling I got whilst sitting in a IMAX theater watching The Dark Knight for the first time opening weekend. Obviously my screen wasn't as large but it took a film that I've seen more than a hundred times by now and made it feel special again. As an audience member that's why we go to movie theaters and as a home theater enthusiast that's what I want my projector to recreate: a test that the Starlight 3 passed with flying colors.
Comparisons and Competition
When you discount the added cost of the Starlight 2:35 Wide System kit and look solely at the Starlight 3's retail price and performance there are a number of projectors that come to mind that directly compete with it, the most obvious being the JVC RS35U, which the Starlight 3 is based upon. Retailing for $10,000 the RS35U is technically capable of the same image quality as the Starlight 3, though it lacks the designer industrial design and lower fan noise. Not to mention the in-house internal tweaks and dedicated, custom installer support which comes standard with all DreamVision products; whereas you can purchase JVC via the Internet. I'm not saying JVC is bad, I'm just stating that the $3,500 up charge you'll pay for the Starlight 3 isn't completely unwarranted given DreamVision's commitment to its customers and specialty dealers.
That being said, you can easily purchase less expensive D-ILA based front projectors. My personal reference, Anthem's LTX-500, is a JVC sourced D-ILA projector that retails for $7,499. While the LTX-500 is a fine projector at half the price of the Starlight 3, the two can't really be compared, for the Starlight 3 is in a whole other league in terms of image quality.
Of course there are fine DLP designs out there that rival the Starlight 3. Two examples that spring to mind are Digital Projection's M-Vision series of projectors and Marantz's VP-15S1. Both the M-Vision and VP-15S1 are DLP based designs, which yield a slightly different looking, though equally impressive image in their own right and cost roughly the same as the JVC RS25U and the Starlight 3.
For more information on front projectors or for help in deciding which front projector may be right for you please visit Home Theater Review's Front Video Projector Reviews and Information page.
The Downside
My first downside is going to sound utterly ridicules because it's a problem many projectors wish they had - the Starlight 3 is too quiet. Too quiet, how can that possibly be a downside? It's not a downside when the projector is in operation, however I cannot tell you how many times I've mistakenly turned the projector off, thinking I was turning it on for the first time, because the Starlight 3 makes virtually no noise. I kind of wish the folks at DreamVision would add some sort of startup "chime" or sound letting you know the Starlight 3 is, in fact, warming up and not ignoring its remote control.
Speaking of warm up, the Starlight 3's warm up procedure is very long and if you don't have the internal menu set to display a warm up image or color you will be sitting in the dark for a minute or so before enjoying the show.
Because of its custom designer chassis the Starlight 3's mounting points are the same as the JVCs; however they require a slightly longer screw to account for the added thickness of the case. It's an easy enough problem to fix (a quick trip to Lowes for me) however it's something to keep in mind if you're considering using a JVC-friendly universal mount. Obviously, your local DreamVision dealer will probably have to deal with this "problem" for you but it's worth pointing out.
I'm not a huge fan of the Starlight 3's side positioned inputs for the same reason I'm not a big fan of side mounted inputs on today's super thin HDTVs: cable routing is rather difficult for it's hard to hide wires and power cables that are jutting out from the side of a projector (or display) versus bundled in the back. DreamVision moved the Starlight 3's manual controls to the back of the projector (they used to reside on the top) so I have to think they can do the same with the inputs.
Lastly and with regards to DreamVision's Wide System kit, a little bit better instruction and/or markings are in order to ensure proper installation each and every time. The Schneider lens is a vertical compression lens however with it being round (like most all lenses) it's difficult to tell top from bottom, meaning you can accidentally install the anamorphic lens sideways causing for a wildly distorted image. You can hold the lens up to a light and deduce which way it should be mounted but if you go off of the printed text on the lens, or the mounting bracket itself you may be in for quite a shock...I was.
Conclusion
Let's be honest, $13,595 is a lot of money when it comes to today's crop of HD front projectors. It's a lot of money considering the very projector the Starlight 3 is based off of costs less. So how should the Starlight 3 be viewed then? In my opinion you should view the Starlight 3 against costlier rivals, for that is its competition. I feel the Starlight 3 is all the HD projector one will ever need.
Now, if you're looking to rock a screen in excess of say 150-inches (roughly 12 feet) diagonal in a non-light controlled room, then perhaps you should look elsewhere, but the vast majority of home theaters feature screens ranging in size from 92 to 120 inches, which is right in the Starlight 3's wheel house. Not to mention the typical theater that will play host to a Starlight 3 is one that has been purposely built and designed by a qualified custom installer, meaning the Starlight 3 is going to be put to use exactly how it was intended to be. Keeping those parameters in mind, I do not believe there is any reason to spend more than the Starlight 3's asking price, for I honestly don't believe it will yield more performance, at least when it comes to D-ILA based projectors.
Now, there are those who will gravitate towards DLP technology, which can be brighter, punchier and in some instances cheaper than D-ILA or the Starlight 3. One technology is not better than the other, they're simply different and present images differently as well. Which one you'll like is ultimately up to you. For me, D-ILA is the way to go and because of this I would recommend the Starlight 3 in a heartbeat, for it is one of the finest projectors I've ever seen.
The Starlight 3's outer beauty is surpassed only by its inner beauty and ability to reproduce accurate images complete with natural colors, detail and contrast that you're simply not going to find in less expensive D-ILA designs. More impressive still is the Starlight 3's black level detail, which is among the best period, regardless of make, model or price.
To say that I've enjoyed my time with the Starlight 3 is an understatement -it's far and away the best projector I've reviewed thus far and one I'm going to be sad to see go. This includes projectors from the likes of Runco and SIM2 for far more money. This projector rocks.
